SDSU Psychology Department
Research Participation Tutorial for
Participants/Students
Revision 6
Introduction
The Psychology Research Participaton System provides an easy method for you to sign up for studies and track your progress through the term. Everything is done through the software’s web-based interface. You can access the system at any time, from any web-enabled computer, with a standard web browser. The site is located at http://sdsu.sona-systems.com/
Getting Started
The system works best if you use a web browser that is less than 2 years old. It works well with Internet Explorer version 4 and above, Netscape version 4 and above, and Firefox version 1 and above. It will work with other web browsers and with older versions of Internet Explorer and Netscape, however the layout may not be as clean. No functionality will be lost by using an older web browser. This documentation assumes you have a basic knowledge of how to use the web. On this system, it is not necessary to use the Back button. You can always use the toolbar on the top of every screen to navigate anywhere on the site.
When you first log in to the system, you will be asked to take an online pretest before you use the system which gathers demographic data for research participants. After you have completed the pretest you will be able to view a list of available studies (and any restrictions), sign up for studies that interest you, and track your credits throughout the semester.
Research Screening
Research Screening is worth 1 hour credit toward the research requirement (for PSY101). You will have the opportunity to take a set of online surveys which will determine eligibility for studies that invite students to participant based on survey responses. If you choose not to participate in Research Screening you will miss out on several very interesting studies that use the pretest for selection purposes, so participation is strongly encouraged. All questions are either multiple-choice or short fill-in the blank, and there are no right or wrong answers. It is easy to complete and takes about one hour. You may not take the survey more than once, so choose your answers thoughtfully.
Registering for an Account
Student/Participant accounts will automatically be created for all PSY 101 students at the end of the second week of classes. Students will receive an email from the Psychology Research Participation System with account login and password information. Accounts will be created for students who add the course following the add/drop deadline.
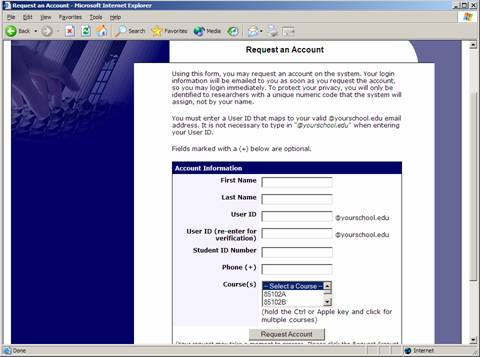
If for some reason you are registered for the course and an account was not created for you , you can request self-register. There is a link on the lower left side of the Psychology Research Participation site that says, “New Participant? Request an account here.” Click on that link, and provide the information it asks for to set up your account. After you have entered the account information, you should receive an email from the system which will contain your login information and instructions. The email will come from the site administrator’s email address (sdsu-admin@sona-systems.net ), so be sure to configure your junk mail filters to allow email from that address. You will be assigned a default password, which you can change after your first login.
Figure 1 – Requesting an Account
Logging In
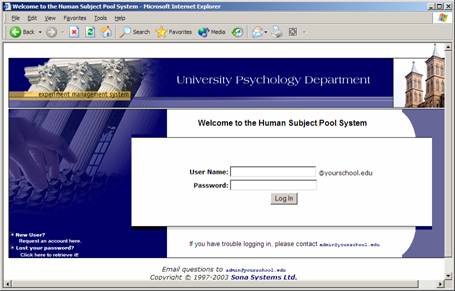
Once you have your login information, go to the front page of the site at http://sdsu.sona-systems.com/ and enter your user ID and password to login.
Figure 2 – Login Page
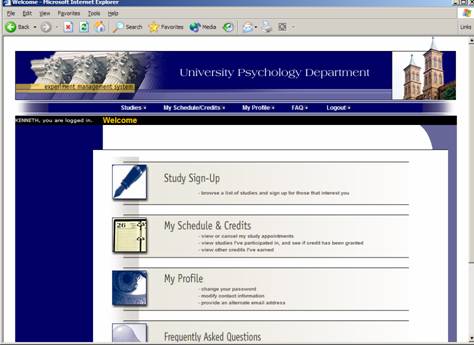
Once you login, you will be asked to participate in the presreen. You may not take the prescreen more than once, so choose your answers thoughtfully. After you complete this task, you will see the Main Menu.
Figure 3 – Main Menu
Your login (also known as a session) will expire after a certain period of inactivity, usually 20-60 minutes. This is done for security purposes. If this happens, you can always log in again. When you are done using the system, it is better to explicitly log out, to prevent any problems that may arise if someone uses your computer before the session expires. This is especially important if you are using a public computer lab.
Retrieving a Lost Password
There is an option located on the lower left corner of the main login page, where you can ask the system to email your password to you. After you submit the form, the password will be emailed and should arrive in your inbox momentarily. Do not email the Site Administrator to ask for your password unless you have tried to retrieve your password through the system and been unsuccessful.
Logging Out
When you are finished using the system, choose Log Out from the toolbar on the left side of the page. It is always a good security measure to close all your browser windows as well, especially if you are using a computer that is shared by others.
Updating Your Profile – Change Password & Other Information
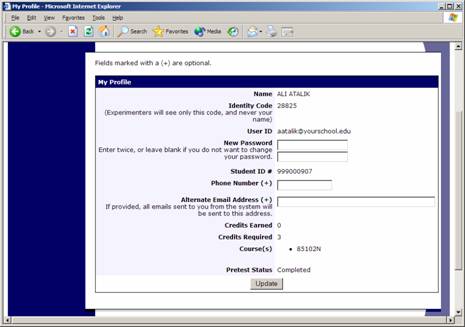
If you would like to change your password or other information about yourself, login to your account and choose My Profile from the top toolbar. If you would like to change your password, type your new password (twice, for confirmation) in the boxes provided.
Figure 4 – Updating Your Profile
Email Address Options
There are certain events in the system which will cause an email notification to be sent to you. Most often, these are notifications that you have received credit for a study, or a confirmation that you have signed up for a study. Your email address will be displayed to the researcher when they view who has signed up for their study, in the event that they need to contact you.
You have two choices for your email address. When you update your profile, you will see a box where you may provide an alternate email address. If you provide such an address (this could be a Hotmail account, for instance), this is the address where any notifications will be sent, and this is also the address that will be displayed to researchers.
Unique ID Codes
The system will automatically assign a unique, numeric ID code to you. You should continue to use your normal login ID to log in to the system. The purpose of the ID code is to identify you to researchers in a way that does not reveal your identity or compromise your privacy. You will see this ID code when you update your profile, and in email confirmations and reminders about your upcoming study sessions. You should bring this ID code with you when you go to studies or when communicating with researchers, as they know you only by your ID code, and not your name.
Studies
With the system, you may view studies and sign up for those that interest you if you meet their requirements. You may cancel your sign-up through the system as well.
Some studies are conducted online. It is usually assumed you will participate in these studies shortly after you sign up for them, but you have until the deadline date to participate.
Viewing Studies
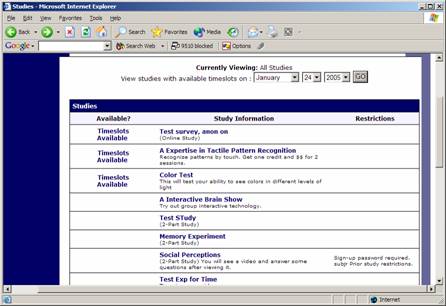
To view a list of studies, click on Studies from top toolbar. You will see a list of studies. A brief description of each study will be listed, as well as any special requirements that may restrict your eligibility to participate in the study.
Figure 5 – Viewing Studies
Studies that currently have available participation times (timeslots) will have “TIMESLOTS AVAILABLE” listed next to the name of the study. If no studies have available timeslots, you may want to logon to the system a few days later to see if new timeslots have been added. You may also select a specific date to view studies with available timeslots on that date. To view more information about a study, click on the name of the study.
Two-Part Studies
Some studies are two-part studies, where you must sign up for both parts of the study at once, and the two parts must be scheduled a certain number of days apart. These studies will be clearly marked.
Online Survey Studies
Some studies may be online survey studies. If you sign up for one of these studies, you will be taken immediately to the survey. You may withdraw from the survey at any time. If you withdraw, you will not be granted credit.
Signing Up For Studies
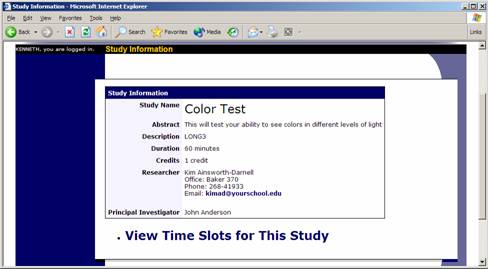
To sign up to participate in a study, find the study you would like to participate in (see Viewing Studies in this documentation). Click on the study name for more information. You will see a list of any special restrictions or eligibility requirements, as well as a contact person if you have questions about the study.
Some restrictions are automatically enforced by the system. If the study has certain pre-requisites or disqualifiers (studies you must not have participated in to participate in this study), those will be listed, as well as a note about whether you meet the eligibility requirements.
Figure 6 – Study Information
The study may have other restrictions listed as Subject Restrictions. An example of a Subject Restriction is “Left-handed people only.” If listed, then the system does not enforce this restriction, but you should only sign up for the study if you meet the requirements.
Some studies require a special password to sign up. If this is the case, it will be noted. The researcher should have given you this special password. It is not the same as the password you use to login to the system. You will need to enter the special sign-up password just before you click the Sign Up button to sign up for a timeslot.
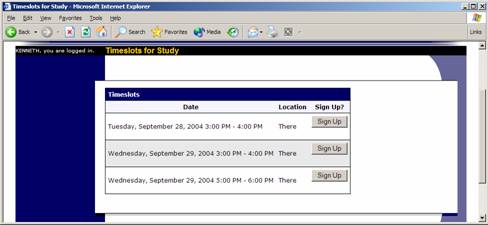
You may only sign up for a timeslot up until a certain time before that timeslot is scheduled to occur. The system will not show a Sign Up button for timeslots where it is too late to sign up.
Figure 7 – Study Timeslots
Once you have determined you meet all the requirements, click on View Timeslots for This Study and you will see a list of available timeslots. Choose a timeslot that is convenient for you, and click Sign Up.
After you click Sign Up, you will see information displayed confirming the time and location of the study you plan to participate in. You may receive an email confirmation as well, depending on how your system is configured. You are now signed up for the study. To cancel your sign-up, see Canceling a Sign-Up in this documentation.
Canceling a Sign-Up
Cancellations need to be done at least 24 hours before the scheduled time to avoid receiving a 1hr. “no-show” penalty (which subtracts one hour from your total hours earned).
If you need to cancel a timeslot you have signed up for, you can do this from the My Schedule and Credits page. Choose the My Schedule/Credits option from top toolbar.
You will see listed all the studies you have signed up for, as well as those you have completed (see the Tracking Your Progress section of this documentation for more information).
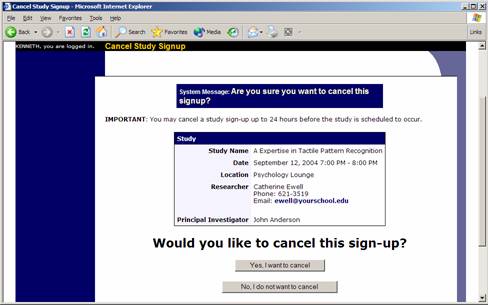
Studies you have signed up will have a Cancel button next to them. There is a 24-hour time limit before the study is to occur, when it is too late to cancel. This restriction is listed at the bottom of the page.
Figure 8 – Sign-Up Cancellation
Once you click Cancel to cancel your sign-up, you will see a confirmation page, where you will be given the option to change your mind about canceling the appointment or proceed with the cancellation.
If you cancel the first part of a two-part study, the second part will also be cancelled. If you cancel the second part of a two-part study, the first part will not be cancelled, but you will need to ask the researcher to sign you up for the second part again, if you would like to participate in it at a later date.
No-Show Penalty
If you fail to appear for a study, you may be assessed a 1hr. penalty that will be deducted from your current credit earnings. Next to each credit or penalty, you can see any comments the researcher left regarding the study and your credit or penalty for it. It is possible you might end up with a negative value for the number of credits you have earned if you fail to cancel at least 24 hours before the scheduled time.
No-Show Credit
If the experimenter fails to show up, the student should contact the experimenter and a 1hr. credit will be issued to compensate you for your time.
Tracking Your Progress
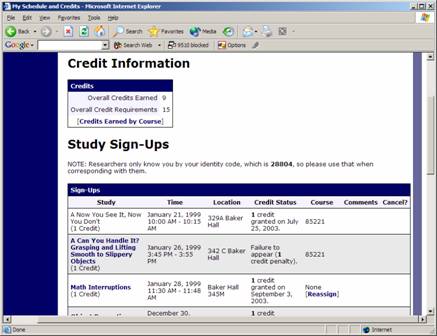
You can track your progress by choosing the My Schedule/Credits option from the top toolbar.
When you view this page, you will see at the top a list of the number of credits you are required to earn, and how many you have earned so far. If you are taking more than one course that you are applying research house to, you can view how many credits you have earned for each course. Below that, any studies you have signed up for will be listed with the credit status for each.
Figure 9 – Viewing Your Progress
If you fail to appear for a study, you may be assessed a 1hr. penalty that will be displayed in your progress, and deducted from your current credit earnings. Next to each credit or penalty, you can also see any comments the researcher left regarding the study.
Non-study credit is also listed, when applicable. Non-study credit is usually granted for writing a paper in lieu of participation in research.
It is possible that older records of your participation are in the system, but not displayed. If that is the case, you’ll see an option to view the older records as well.
Reassigning Credits
If you are taking multiple courses that you want to assign research credit to, you may reassign a credit from one course to another. To do this, simple use the Reassign link that appears when you view your progress. The link appears under the course entry for each item in your progress listing.


